Hard water affects roughly 85% of American homes, causing scale buildup, reducing appliance lifespan, and leaving soap scum on fixtures. A water softener system works silently behind the scenes to solve this problem, but most homeowners have no idea what’s actually happening inside the tank. Understanding water softener parts isn’t just about knowing what to call things, it’s about recognizing when something’s wearing out, what needs maintenance, and whether you can tackle a repair yourself or need to call a pro. This guide walks you through the essential components, how they work together, and what to watch for when your system starts showing age.
Table of Contents
ToggleKey Takeaways
- Understanding water softener parts—the main tank, resin bed, brine tank, and valve head—helps you diagnose problems early and avoid costly service calls.
- The resin bed is the core component where ion exchange removes hard minerals and typically lasts 10 to 15 years before needing replacement.
- Common maintenance issues like salt bridging, brine float failure, and worn valve seals can often be prevented with regular inspections and simple upkeep.
- Most water softener parts are individually replaceable, making targeted repairs far more affordable than replacing the entire system.
- Hard water signs like poor soap lathering, spots on glassware, and decreased softening cycles indicate worn water softener parts that need attention.
What Are Water Softener Parts and Why They Matter
A water softener isn’t a single unit, it’s an integrated system of parts working in tandem to remove hard minerals (calcium and magnesium) from your water supply. Without understanding these components, you’ll struggle to diagnose problems or know when replacement is necessary.
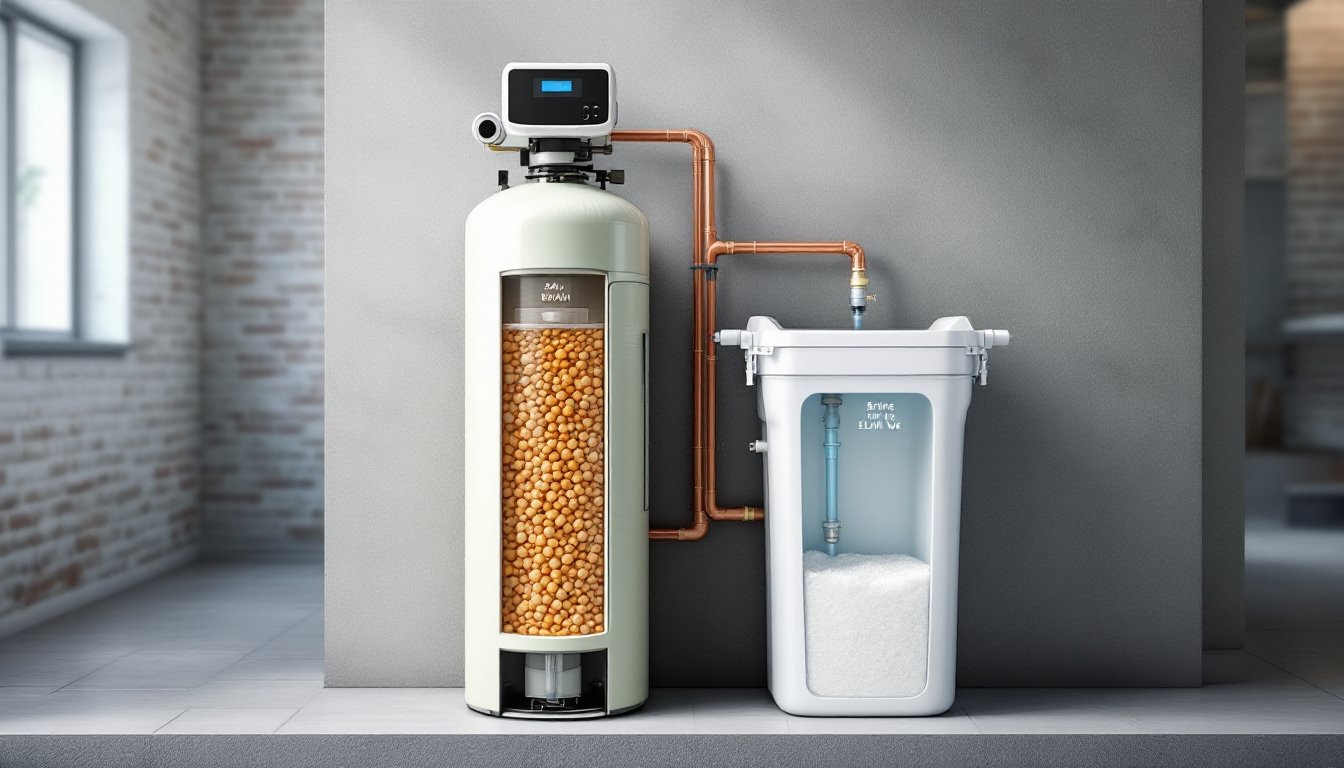
Each part plays a specific role: the main tank holds resin beads that trap hard minerals, the brine tank stores salt for regeneration, and the valve head controls when and how water flows through the system. When one part fails, the whole system underperforms. For example, if the resin bed degrades, even a perfectly functioning valve can’t soften water effectively. The good news is that most water softener parts are replaceable, and a few failures don’t mean dumping the entire unit.
Knowing your system’s anatomy also helps you maintain it properly. Regular salt top-ups, occasional tank rinsing, and understanding regeneration cycles prevent costly downtime. Many homeowners spend hundreds on service calls for issues that a basic understanding could have prevented.
The Main Tank: Your System’s Core Component
The main tank is the workhorse, a pressure vessel (usually fiberglass, steel, or plastic) that holds the resin bed and allows hard water to flow through it. Most residential units range from 30 to 80 gallons in capacity, sized to match your household’s water usage and hardness level.
Inside the main tank sits a distributor tube at the top and an underbrain assembly at the bottom. The distributor tube spreads incoming water evenly across the resin bed for consistent softening. The underbrain collects softened water and directs it back into your pipes. Over time, the distributor tube can crack or corrode, causing uneven water distribution and poor softening performance.
The tank itself can develop leaks, especially in steel models susceptible to rust. Small cracks in fiberglass or plastic tanks are often beyond repair, though patch kits exist for minor damage. If your tank leaks at the seams or shows persistent dripping at the base, replacement is usually cheaper than fixing it. Typical main tanks cost $300 to $800 depending on capacity and material, still a fraction of replacing the entire system.
The Resin Bed and Ion Exchange Process
The resin bed is where the magic happens. These tiny plastic beads (about the size of grains of sand) are coated with sodium ions. When hard water flows through, calcium and magnesium ions swap places with sodium ions in a process called ion exchange. The resin beads trap the hard minerals, and soft water continues downstream.
Over time, the resin beads become exhausted and can’t hold more hard minerals. That’s why your water softener regenerates, usually at night, flushing a strong saltwater solution through the resin bed to recharge those sodium ions. Most systems regenerate every few days, depending on water hardness and household usage.
Resin beds typically last 10 to 15 years before needing replacement, though this varies with water quality and regeneration frequency. Signs of a failing resin bed include soft water that doesn’t last as long (shorter cycles), visible resin particles in your water, or musty smells. Replacing a resin bed costs $200 to $500 and is a moderately technical DIY job, you’ll need to access the main tank, drain the old beads, and carefully pour new ones without damaging the internal components. Detailed guides and product kits are available to simplify the process.
Brine Tank and Salt Management
The brine tank stores the salt (or potassium chloride) that regenerates your resin bed. Most brine tanks are separate from the main tank and hold 40 to 100 pounds of salt, depending on the system’s capacity. The tank itself is usually a simple plastic container, but it serves a critical function.
Inside the brine tank sits a brine float valve that prevents overfilling and a brine pickup tube that draws the salt solution when regeneration occurs. If the brine float sticks or fails, the tank may overfill and spill, or underflow and starve the resin bed during regeneration.
Common brine tank issues include salt bridging (a crust forms on top, preventing water from reaching the salt below) and sediment accumulation (dirt or mineral deposits clog the system). You can prevent bridging by using solar salt (evaporated salt crystals) instead of rock salt, and by occasionally breaking up any crust with a broom handle. If the brine tank cracks, it’s usually cheaper to replace it ($100 to $300) than to repair it. The tank itself is simple enough that swapping it out requires only disconnecting the pickup tube and inlet connection, no special tools needed.
Valve Head and Control Mechanism
The valve head sits atop the main tank and controls the flow of water through the system. Think of it as the brain: it routes water through different cycles (service, backwash, rinse, brine draw) to soften water and regenerate the resin bed. Most modern systems use mechanical timer valves or electronic metered valves, each with pros and cons.
Mechanical timers regenerate on a fixed schedule (e.g., every three days), regardless of water usage. They’re simple, affordable, and reliable but can waste salt and water if your household uses less than expected. Electronic metered valves regenerate only when the resin bed is exhausted (based on water flow), making them more efficient and cost-effective long-term.
The valve head contains rubber seals and internal pathways that can degrade over time. Leaks at the valve connection, sluggish water flow, or failure to regenerate (check the display or timer first) often point to a worn valve head. Replacement typically costs $400 to $900 depending on the valve type and whether you hire a professional. Many valves have replaceable cartridge kits ($150 to $300) that can extend the valve’s life without full replacement. If you’re handy, some cartridge replacements are DIY-friendly, though dealer installation guarantees proper settings and warranty coverage.
How to Identify and Replace Worn Water Softener Parts
Knowing what to look for is the first step in extending your water softener’s lifespan. Hard water returning to your taps (soap won’t lather, spots on glassware) is the clearest sign something’s wrong. Next, check for visible leaks around the tanks, listen for unusual noises during regeneration, and monitor salt consumption, if you’re adding salt every week when it should last months, the system is regenerating too often.
Most repairs start with the simplest culprits: Is the brine tank full? Is the salt bridged? Did you forget to add water to the brine tank after refilling? Honest mistakes cause 30% of service calls. Once you’ve ruled out operator error, systematically test each component.
Replacing a part depends on access and complexity. The brine tank is the easiest swap, just disconnect two lines and swap the tanks. The distributor tube or underbrain requires opening the main tank: this needs a tank opener tool ($30 to $50) and is doable if you’re comfortable draining 50+ gallons. Valve head replacement varies: some unscrew easily, others need a wrench set and precise reassembly. When it comes to water softener maintenance, regular inspection and flushing prevent most failures. For major work, main tank replacement, full resin bed changeouts, or valve head issues, many homeowners prefer professional service to avoid downtime and ensure warranty compliance. Detailed water softener parts diagrams can guide you through these tasks. If leaks persist or the system won’t regenerate after basic troubleshooting, water softener repair guides walk through step-by-step diagnostics and show you when to call in a licensed plumber.
Conclusion
Water softener parts aren’t mysterious, each one has a clear job, a typical lifespan, and a known failure mode. By understanding the main tank, resin bed, brine tank, and valve head, you’re equipped to spot problems early and make smart decisions about repairs. Sometimes a simple salt refill or timer adjustment fixes everything: other times, a $400 valve replacement saves you from total system failure. Regular maintenance and a little knowledge keep your soft water flowing for years.